



Display elements in SOPs and work instructions
Last updated:
Display steps show information to the operator without asking for input: formatted explanation text, a caution / safety note, an image, a reference photo, a good / bad example, a PDF such as a drawing or manual, a YouTube or recorded video, a screen recording and a divider. They put the knowledge on the page itself, right next to the checks and fields the operator fills in.
Display elements show information to the operator while a Standard Operating Procedure (SOP) runs in the Work Instruction App: an image of the correct situation, a good / bad example, a PDF drawing, a video of the task or formatted text. This guide explains every display element and when to use it.
Display elements do not ask the operator for anything; they show content on a page. Combine them with user input and device input fields to build pages that first show what to do and then record what was done, and use the grid system to place a display element next to an input field.
How to add a step
Every page of a work instruction is built from steps. Adding one works the same for every step type:
- Open the editor. Create a new work instruction or open an existing one and choose Edit.
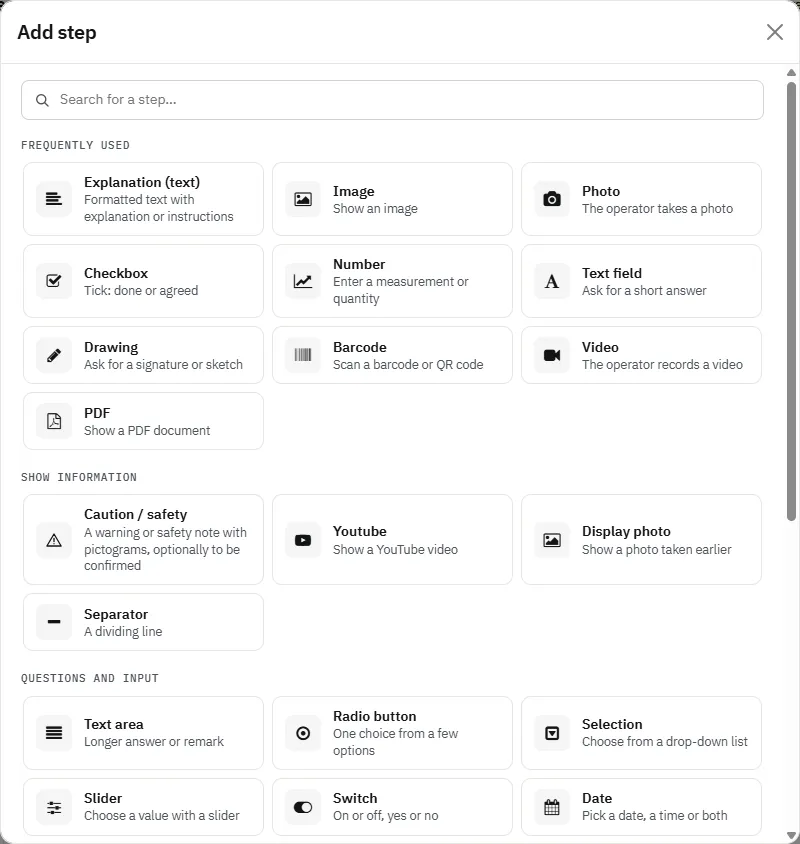
- Pick a step. Click Add step and choose the step in the step picker. The search field finds a step by name, description or a related word: scrap finds the Counter, four eyes the Colleague check.
- Set the label. Give the step a short, clear label: the operator sees it above the step. Click the step to change its label, width or required setting.
- Publish. Changes are saved as a draft automatically. Click Publish to make the new version available to operators.
Explanation (text)
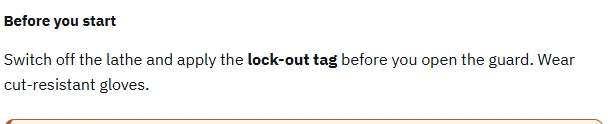
The Explanation (text) step shows formatted text on the page: the instruction itself, with headings, bold text, lists, links and images. Use it for what the operator has to do and why.
Add it to a work instruction
- Open the work instruction in the editor and click Add step under the last step.
- Choose Explanation (text) in the group Frequently used of the step picker, or type the name or a related word in its search field. Steps your organisation uses often are listed first, under Frequently used.
- Write the explanation in the text editor: headings, bold text, lists and links. Keep it short; one instruction per step reads best.
Caution / safety
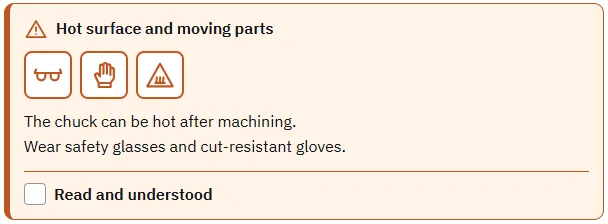
The Caution / safety step shows a warning or safety instruction in a coloured frame: information, warning or danger, with pictograms for the protective equipment and the hazards that apply. Optionally the operator confirms with Read and understood before going on, and the run records when.
Add it to a work instruction
- Open the work instruction in the editor and click Add step under the last step.
- Choose Caution / safety in the group Show information of the step picker, or type the name or a related word in its search field. Steps your organisation uses often are listed first, under Frequently used.
- Choose the level (information, warning or danger), write the text and click the pictograms that apply. Switch on Confirmation required when the operator must tick Read and understood before going on.
Image
The Image step shows an image you upload, such as a drawing, a safety sign or a photo of the correct situation. The operator can open it full screen.
Add it to a work instruction
- Open the work instruction in the editor and click Add step under the last step.
- Choose Image in the group Frequently used of the step picker, or type the name or a related word in its search field. Steps your organisation uses often are listed first, under Frequently used.
- Upload the image, for example a safety sign or a drawing of the correct situation. Phones show it full width.

Divider
The Divider step draws a line between steps, to split a long page into parts that belong together.
Add it to a work instruction
- Open the work instruction in the editor and click Add step under the last step.
- Choose Divider in the group Show information of the step picker, or type the name or a related word in its search field. Steps your organisation uses often are listed first, under Frequently used.
- A divider needs no settings. Use it to split a long page into parts that belong together.
The PDF step shows a PDF file on the page, such as a drawing, a machine manual or a safety data sheet.
Add it to a work instruction
- Open the work instruction in the editor and click Add step under the last step.
- Choose PDF in the group Frequently used of the step picker, or type the name or a related word in its search field. Steps your organisation uses often are listed first, under Frequently used.
- Upload the PDF, for example a drawing or a machine manual. The operator scrolls through it on the page.
Show photo
The Show photo step shows a photo you take with the camera or upload while making the work instruction, for example a reference of the correct result. The operator only looks at it. To show the right and the wrong way side by side, use the Good / bad example.
Add it to a work instruction
- Open the work instruction in the editor and click Add step under the last step.
- Choose Show photo in the group Show information of the step picker, or type the name or a related word in its search field. Steps your organisation uses often are listed first, under Frequently used.
- Take or upload a reference photo of the correct result, so the operator can compare it with the real situation.

Show recorded video
The Show recorded video step plays a video you record in the editor with the camera of your device, for example while you show how a part is clamped. The operator watches it on the page.
Add it to a work instruction
- Open the work instruction in the editor and click Add step under the last step.
- Choose Show recorded video in the group Advanced of the step picker, or type the name or a related word in its search field. Steps your organisation uses often are listed first, under Frequently used.
- Record the video in the editor with the camera of your device, for example while you show how a part is clamped. Operators play it on the page.
Screen recording
The Screen recording step plays a recording of your screen made in the editor, for example to show a task in an ERP screen. The operator watches it on the page.
Add it to a work instruction
- Open the work instruction in the editor and click Add step under the last step.
- Choose Screen recording in the group Advanced of the step picker, or type the name or a related word in its search field. Steps your organisation uses often are listed first, under Frequently used.
- Record your screen in the editor while you show a task in software, for example an ERP screen. Operators play the recording on the page.
YouTube video
The YouTube video step plays a YouTube video on the page, from a link or a video id, so the operator does not leave the work instruction.
Add it to a work instruction
- Open the work instruction in the editor and click Add step under the last step.
- Choose YouTube video in the group Show information of the step picker, or type the name or a related word in its search field. Steps your organisation uses often are listed first, under Frequently used.
- Paste the link or the ID of the YouTube video. It plays on the page, so the operator does not leave the work instruction.
Good / bad example
The Good / bad example step shows two images side by side: the right way in a green frame with a check mark, the wrong way in a red frame with a cross, each with a short caption. A picture of the mistake next to the right result is often clearer than a paragraph of text, and it works in every language on the shop floor. On a phone the two images are stacked; a tap opens an image full screen.
Example: Stacking the pallets: on the left Straight, at most 3 high, on the right Leaning stack. The same works for a weld seam, a crimped connector, the position of a label or the way a part is packed.
Add it to a work instruction
- Open the work instruction in the editor and click Add step under the last step.
- Choose Good / bad example in the group Show information of the step picker, or type the name or a related word in its search field. Steps your organisation uses often are listed first, under Frequently used.
- Upload an image under Good example and one under Bad example, or choose one you uploaded before. Add a Caption (optional) that names the difference; without one the image is labelled Good or Bad.
What the run records
Nothing: like the other display steps it only shows information, so it is never required and never a deviation. The run details and the print page show the pair as the operator saw it, and the images stay available for runs without a connection.
Tip: Take both photos from the same angle and distance, so the only difference the operator sees is the one that matters. Put the check itself right after it, for example an OK / Not OK step.
Other input types
Try the Work Instruction App for free
Create your first digital work instruction in minutes. 30-day free trial, no credit card required.
No credit card · Cancel any time · Live in 5 minutes
Frequently asked questions about display elements
Display elements show information to the operator, such as an image, a PDF or a video. Input fields ask the operator for something, such as a value, a photo or a signature (see user input and device input).
Yes. The PDF step shows a PDF file on the page and the YouTube video step plays a YouTube video, so a drawing or a demonstration is available without leaving the instruction.
Yes. With the grid system every element gets a width of full, 1/2, 1/3, 2/3 or 1/4, so an image of the correct situation can sit next to the field where the operator records the result.