In short: digitising paper work instructions is not a scanning project. List what you have, start with the instructions where errors are expensive or that are used every day, clean them up into one task per instruction, then either upload the existing PDF for a quick start or rebuild the instruction step by step with checks and photos. Test it on one line, put a QR code or NFC tag at the workplace, remove the paper on the same day and let version control take over from the folder.
Why not just scan the folder?
A scanned binder is still a binder: one long document, no clear version, no record of who followed it and no way to ask for a measured value or a photo of the result. Operators keep the laminated copy at the machine because it is faster than looking for the file. The real gains of digital work instructions come from three things paper cannot do: one current version that everyone sees, instructions that open at the right place, and a record of every run. We describe those benefits in why digital work instructions; this article is about getting there without stopping production.
Which migration route fits which instruction?
There are three ways to bring an existing instruction into a digital system. You do not have to pick one for all documents: most companies use all three, depending on the risk of the task.
| Route | How it works | Pros | Cons |
|---|---|---|---|
| Upload the PDF as-is | Export Word, Excel or PowerPoint to PDF and convert the file into a work instruction | Fast; the content stays exactly as approved; one central version from day one | Still a document to read; no required checks or input per step; hard to read on a phone |
| Rebuild with blocks | Recreate the instruction step by step with text, photos, checkboxes, number fields and signatures | Readable on any screen; required checks; every answer is recorded per run | Takes more time per instruction; someone must know the task well |
| Photo work instruction | Take photos of the task in sequence; each photo becomes a step with a caption | Very quick for visual tasks; little text, so easy for multilingual teams | Less suitable for tasks with many values or decisions; photos must be retaken when the workplace changes |
A practical rule: upload as-is for reference documents and low-risk tasks, rebuild with blocks for anything where a missed step causes scrap, rework, an incident or an audit finding, and use photos for short visual tasks such as setting up a fixture.
The 10-step plan
1. Make an inventory of what you have
List every work instruction, wherever it lives: shared drives, binders at the line, laminated sheets, e-mails and the notebook of your most experienced operator. Note for each one the title, the task, the line or machine, the owner and the date of the last change. A simple spreadsheet is enough. You will almost always find duplicates, outdated versions and tasks that have no instruction at all.
2. Prioritise by risk and frequency
Score each instruction on two questions: what happens if a step is missed, and how often is the task done? High risk plus high frequency goes first: safety-critical tasks, quality checks, changeovers and start-up procedures. Rarely used, low-risk instructions can wait or be uploaded as-is. This keeps the first weeks focused on the instructions that make a visible difference.
3. Clean up and split into one task per instruction
Before you convert anything, remove what is no longer true and split long documents into one task per instruction. A twenty-page "operating manual" usually holds five or six separate tasks with their own trigger and result. One task per instruction makes them shorter, easier to find at the workplace and easier to keep up to date. Our guide on how to write a work instruction explains how to write the steps themselves.
4. Choose the route: upload the PDF or rebuild with blocks
Decide per instruction which route from the table above you take. For a quick start, export the Word file to PDF and use "Convert files to work instructions": every PDF or image file you upload becomes a step of a new work instruction, named after the file, which opens in the editor. Word, Excel and PowerPoint files are not converted directly, so export them first. For critical tasks, rebuild the instruction in the editor with one step per action, or take a series of photos to create a photo work instruction.
5. Add checks, photos and required fields
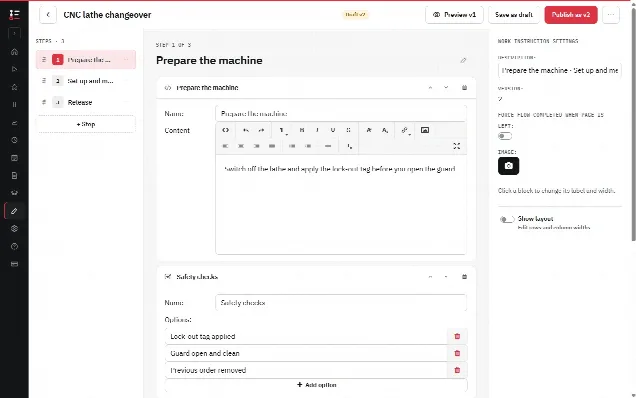
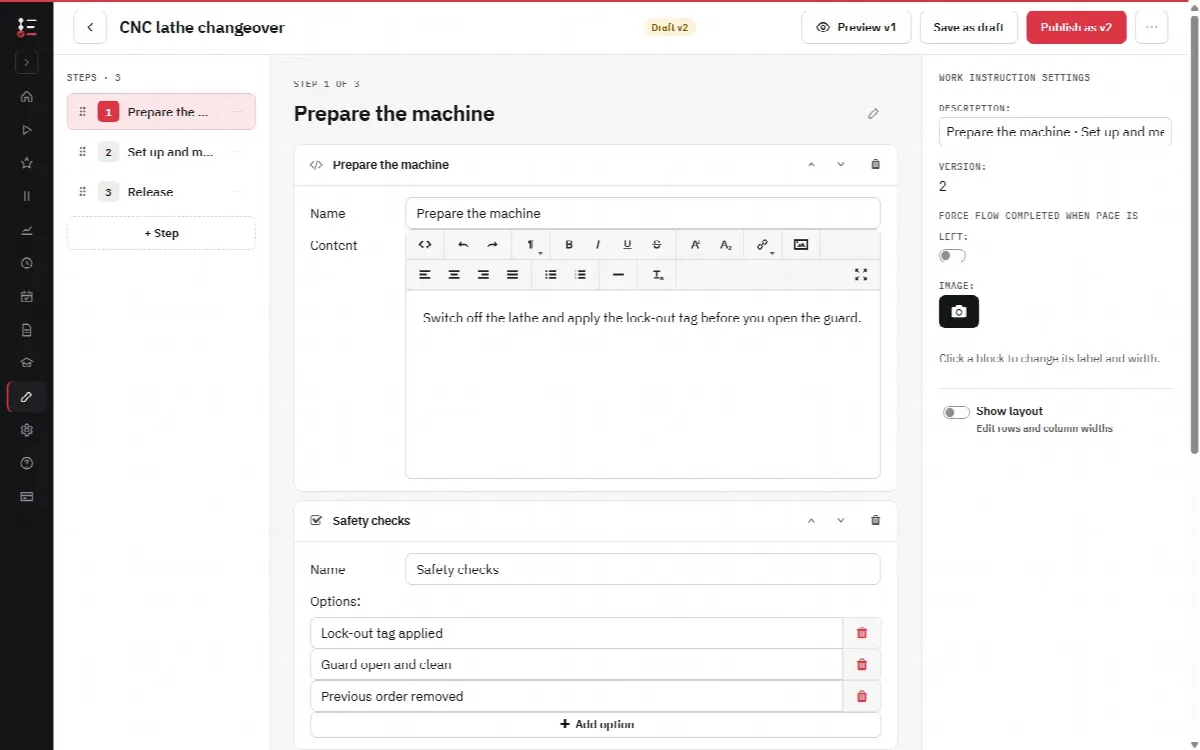
Add a check wherever a mistake would be expensive. A checkbox confirms an action, a number field records a measured value, a photo block lets the operator take a picture of the result, and a signature block confirms a release. Mark these blocks as required: Next and Finish then only work when they are filled in. An uploaded PDF can be improved the same way by adding a confirmation step after it.
6. Pilot on one line
Pick one line or team with a supervisor who wants this to work. Let operators use the digital instructions for two to four weeks and ask them what is unclear, what is missing and where the screen is in the way. Use the feedback to fix the instructions and the setup (which device, where it hangs, how operators open the instruction) before you roll out further.
7. Put QR codes or NFC tags at the workplace
An instruction that takes a minute to find will not be used. Place a QR code or NFC tag on the machine, the workstation or the storage location, so that scanning it opens the right instruction straight away. Operators can also find instructions through search or favourites, but a code at the point of use is what replaces the sheet that used to hang there.
8. Retire the paper copies
On the day the digital version goes live, remove the paper copy from the workplace, and tell people why. If both exist side by side, the paper copy wins because it is already there, and you are back to several versions. Archive the old documents according to your own retention rules rather than throwing them away.
9. Hand version control to the system
From now on, changes are made in the system, not in a file on someone's desktop. Give every instruction an owner who edits the draft and publishes it as a new version. Older versions stay traceable, and every run records which version was followed. Agree when an instruction is reviewed: after a process change, a complaint or an incident, and at a fixed interval.
10. Roll out line by line
Repeat steps 4 to 9 per line or department, using what you learned in the pilot. Keep the inventory from step 1 up to date so you can see what is converted, what is uploaded as-is and what still needs work. Many companies first upload the remaining low-risk documents as PDF, so that everything is in one place, and rebuild them with blocks later when they change.
What usually goes wrong?
- Converting everything before anyone uses it. Hundreds of uploaded documents nobody opens are not a success. Start small and prove it on the floor.
- Copying long documents one to one. A long PDF on a phone screen is harder to read than on paper. Split it, or rebuild the critical parts.
- No owner per instruction. Without an owner the digital version goes out of date just like the paper one did.
- Keeping paper "just in case". Two versions means nobody knows which one is right.
- No device at the workplace. Decide in the pilot which phones, tablets or PCs are used and where they are, before you roll out.
How does this work in the Work Instruction App?
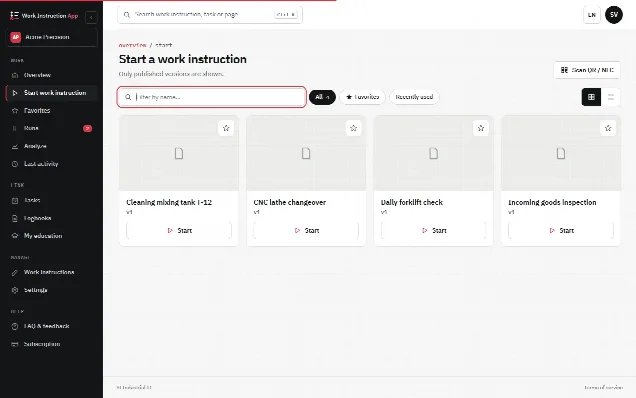
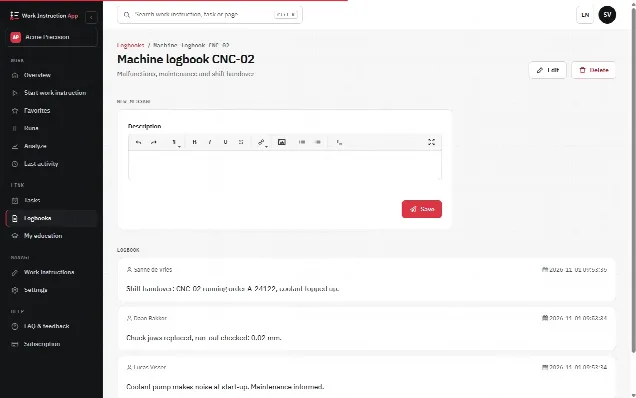
In the Work Instruction App you choose "New work instruction" and either start with a name and build the steps with blocks, take photos or videos in sequence to create a photo or video work instruction, or upload PDF and image files with "Convert files to work instructions". Every step can hold text, images, PDF, video, checkboxes, number and text fields, photos taken by the operator, signatures and barcode scans, and any block can be marked required. The editor saves drafts automatically; Publish creates a new version (v1, v2 and so on) while older versions stay traceable. Operators start an instruction from the overview, by search, from favourites or by scanning a QR code or NFC tag, and every run records the user, the times, the version and every answer. What used to be the filled-in paper form is still available on paper when you need it: every completed run has a print page, and the runs of a period can be exported to Excel or CSV. See version control for how versions work, digital work instructions for an overview, and the getting started guide to build your first instruction.